XBian, Kodi, and trakt.tv
16 Mar 2015So I bought a Raspberry Pi 1 Model B about a year ago and starting playing around with getting XBMC (now Kodi) working to see what I could get out of this wonderful little device. I tried OpenELEC, Raspbian, and XBian. Here's what I ended up with...
When I originally tested the three "distrobutions", XBian was an obvious choice at the time. It simply ran 1080p more smoothly than OpenELEC or Raspbian. However, I would assume by this time, everyone has ultimately equalized on performance. This review seems relatively up to date. With that in mind, lets start with XBian installation.
Installer
XBian has a nice little installer for multiple OSes here. Pretty straight forward:
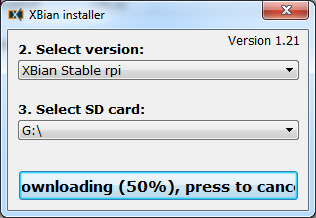
After the installer does its thing, then just pop the SD card into the Raspberry Pi and you are good to go. You can really stop reading here and go have fun.
Trick #1: Run from USB
Sometimes you just need more space and performance than a compatible SD card can provide. Well, I don't really need the space since I have a NAS and performance is always nice. However, the main reason I like to have a USB drive connected to my Raspberry Pi is safety. SD card corruption is real. I don't feel the need to make the /boot partition readonly because we are using a USB drive, but you technically could. I also don't think anything is written to that partition during normal operation.
Thankfully, XBian makes running from a USB drive pretty effortless:
ssh xbian@xbian- xbian-config auto starts on new installations
- Select
6 Xbian Copier - Make sure you only have one USB drive attached
/dev/sda1should be yourDestination- Wait for the cloning process, this takes a bit
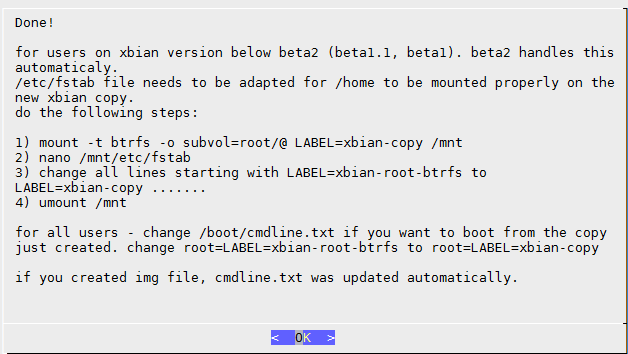
Here's the fun bit. All you need to pay attention to here is the second to last paragraph. While the instructions here are useful and will work, they do not take into account the situation where you might have multiple USB devices labeled xbian-copy. I like things to be very specific, so I found this nice little article on how to make sure your Raspberry Pi doesn't try to boot into the wrong USB drive. Pro tip: The UUID will change after the cloning process is complete. I failed to think about this and bricked my install momentarily, but thankfully the /boot is readable from Windows and was able to fix the /boot/cmdline.txt.
sudo -i
blkid -s UUID -o value /dev/sda1
#Something like 240d84e4-dd44-42df-b31e-fe4f492b5cce will spit out and then plug that into below
Replace the root=LABEL=xbian-root-btrfs with your root=UUID=blah in /boot/cmdline.txt and thats it. You now have a safer and speedier OS drive.
Trick #2: Automatic Updates
If you SSH into the Raspberry Pi again, you can select 5 Updates. On a new install you should run the 2 apt-get update and the 3 Check deb upgrades. This takes some time, but shouldn't be too bad if you are using a USB drive. Finally, I turn on 4 Auto updates, because the XBian crew takes great care to not break everyone. I think this should be on by default, but I can understand why they would want to make sure everyone opts-in.
On the flip side, you don't have to do any of this, and you can just reflash your SD card periodically, but then you will need to repeat the process again for your USB drive.
Trick #3: MySQL Media Libraries
This trick unfortunately requires you to run Kodi on another machine, so it may not be as useful. Updating media libraries through the Raspberry Pi scanner can take forever sometimes. So I try to do this on my PC instead and use that library on the Raspberry Pi. Plus, it maintains all my watched statuses if I brick my Raspberry Pi...which sometimes happens when I am toying around. There is a great article on how to do this. Short version: Online a MySQL instance somewhere and create a user which has all permissions.
CREATE USER 'kodi' IDENTIFIED BY 'kodi';
GRANT ALL ON *.* TO 'kodi';
Then dump this XML into /home/xbian/.kodi/userdata/advancedsettings.xml
<advancedsettings>
<videodatabase>
  <type>mysql</type>
  <host>YOURHOSTHERE</host>
  <port>3306</port>
  <user>kodi</user>
  <pass>kodi</pass>
</videodatabase>
<musicdatabase>
  <type>mysql</type>
  <host>YOURHOSTHERE</host>
  <port>3306</port>
  <user>kodi</user>
  <pass>kodi</pass>
</musicdatabase>
<videolibrary>
  <importwatchedstate>true</importwatchedstate>
  <importresumepoint>true</importresumepoint>
</videolibrary>
</advancedsettings>
Trick #4: Install a lightweight smart skin
There are plenty of skins to choose from, but I have found that Amber is a great skin for the Raspberry Pi. It's doesn't try to do too much and gives you the information you need. I basically download the master branch and choose the "Install from zip" option in the add-on menus. My favorite feature of Amber: Next unwatched episode. Super useful if you don't want to read description to figure out what you have and have not seen. You can see the difference between the two rows in the screenshot. The top row is "Recently Added" while the bottom row is "Recommended". As you can see, newer episodes have been added, but it will recommend the next unwatched episode.
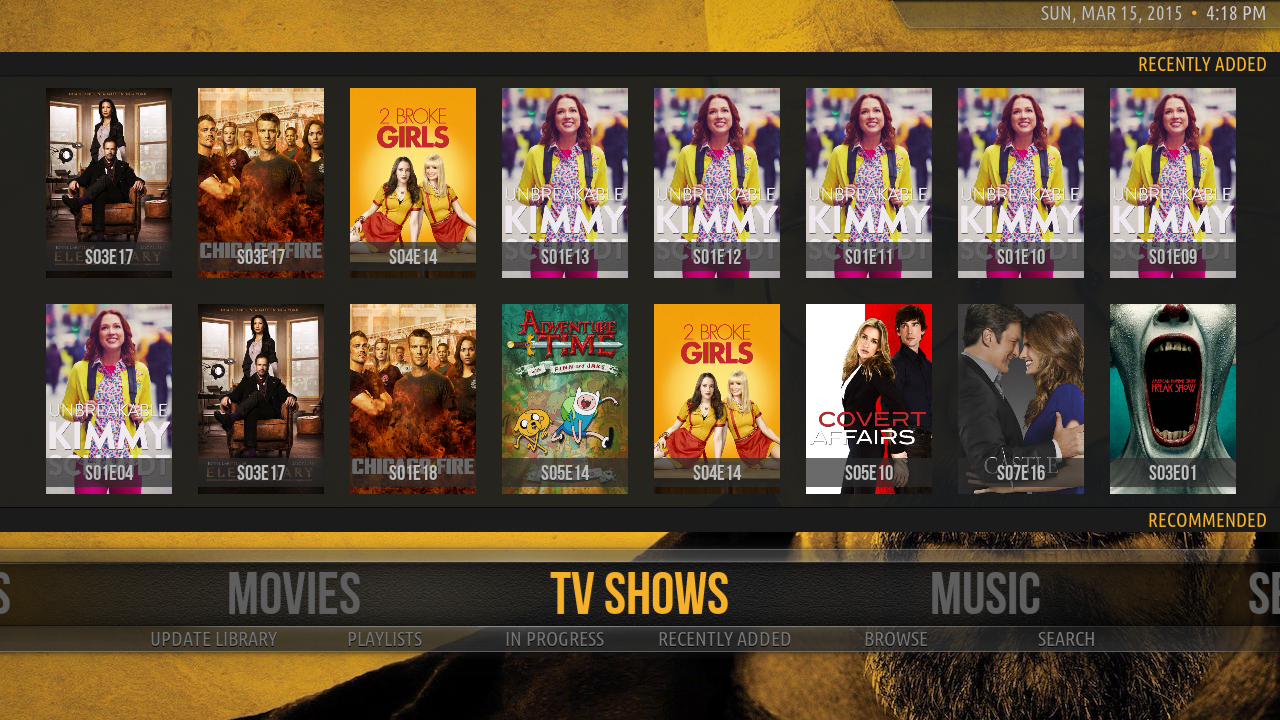
You might also notice this screenshot is 720p. You get a more responsive UI if you dial back from the default 1080p.
Trick #5: trakt.tv Program Add-on
trakt.tv is a great site that helps you track any media you consume. The best part is there is a plugin for Kodi which automatically tracks your progress. This is nice if you don't have the resources to have a MySQL media library. You can skip MySQL and get trakt.tv to sync with a new library to mark episodes as watched. To add this, just go through Settings -> Add-ons -> Search -> trakt.tv You can revel in our guilty pleasures here.
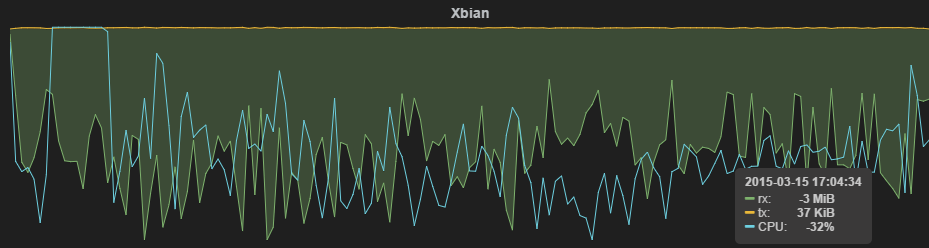
Trick #6: Super Geek Monitoring
I like to know what the computers in my house are doing, so I rig everything up to an InfluxDB instance via collectd. This is what the Raspberry Pi looks like playing 1080p Avengers:
Tricks #7-11: Quality of Life
- Turn on the webserver. It's nice to have when you are in the other room wondering what's on TV.
- Turn on Airplay. This will allow most of your devices to stream to your Raspberry Pi.
- Turn on the remote control. There are Kodi remote controls for all phones. Great for when your TV remote kills your last pair of batteries and you live somewhere with amazing weather.
- Turn off the RSS feed update. It just slows things down.
- If you didn't catch it: Switch to 720p instead of the default 1080p for the UI.
The End
I've been super happy with this setup, especially since I started organizing my collection with SickRage and CouchPotato. :D